Sunday, April 1, 2012

Yummy Energy Bites!

These are so yummy and so quick to make!  I found the link to Gimme Some Oven (cute!) on Pinterest.
You can customize them in so many ways -- add dried fruit, different butters, different chips, etc.  I mostly followed the recipe except I used unsweetened coconut and dark choc chips.  YUM!


Ingredients:
  • 1 cup (dry) oatmeal (I used old-fashioned oats)
  • 1 cup toasted coconut flakes (I used 3/4 unsweetened coconut)
  • 1/2 cup chocolate chips (I used dark choc chips)
  • 1/2 cup peanut butter
  • 1/2 cup ground flaxseed
  • 1/3 cup honey
  • 1 tsp. vanilla
Method:
Stir all ingredients together in a medium bowl until thoroughly mixed.  Let chill in the refrigerator for half an hour.  Once chilled, roll into balls of whatever size you would like.  (Mine were about 1″ in diameter.)  Store in an airtight container and keep refrigerated for up to 1 week.
Makes about 20-25 balls.

Breakfast Burritos

I'm always looking for quick and easy breakfast ideas.  I came across these Breakfast Burritos on Pinterest from Mom On Timeout and decided to give them a try.  I made up half a batch and they're chillin' in the freezer right now.  All the components taste good (I'm eating the handful of leftovers as my lunch;-)).  Hopefully they'll freeze nicely and be easy to grab and go on my way to the pool in the morning.

Breakfast Burritos (adapted from Mom On Timeout blog)
Ingredients:1 lb breakfast sausage
5 medium size red potatoes, diced
8 oz cheese (any kind you like)
12 soft taco tortillas (I used multigrain) 
8 eggs, extra large
1/4 c milk
2-3T  olive oil (enough to coat the potatoes)
1 tsp each:  Seasoning Salt (I used Tony Chachere's) , salt and pepper 

Roast the potatoes: Preheat oven to 450 degrees.Pat dry potatoes to remove excess water.  coat the diced potatoes with olive oil and sprinkle with salt, pepper and seasoning.  Bake on a cookie sheet for about 30 minutes or until golden brown.  Start checking after 20 minutes.

Brown the sausage.  You could also use ham and / or bacon.

Cook eggs: Whisk eggs and milk together.  Add oil or cooking spray to pan and heat on medium.  Add eggs and cook until done.

Just before you're ready to assemble,  heat the tortillas.  Place 4-5 on a plate and cover with a wet paper towel.  Cook for 30 seconds at 50%.  Repeat with all tortillas.

Assembly line:
Tortilla
Cheese
Eggs
Potatoes
Meat

Fold in the sides of the tortilla.
Roll burrito up.
Make sure the burrito is tightly rolled.

Let's freeze these burritos:
1. Line a baking sheet with parchment paper.
2. Place burritos on the sheet, seam side down.
3. Press down on the burritos again lightly making sure that the edges are tucked in.
4. Place baking sheet in the freezer for an hour to flash freeze the burritos.
5. Remove from freezer and wrap burritos in plastic wrap individually.
6. Place in a ziploc bag.
7. I ended up with 8 burritos. 

To heat the burritos:
1. Remove plastic wrap.
2. Wrap burrito in wet paper towel.
3. Heat for 3 minutes on 50% power.
4. Serve with fresh salsa - yummy!

Thursday, March 1, 2012

Cashew Chicken

I know I keep saying this, but this Slow Cooker Cashew Chicken truly is my favorite Pinterest recipe so far!  I made 6 servings and brought 3 to school for some friends and everyone loved it!  It's got a little kick to it and is great served with brown rice.


2 lbs boneless, skinless chicken thigh tenders or chicken breast tenders (*I used breast tenders)
1/4 cup all purpose flour
1/2 tsp black pepper
1 Tbsp canola oil (*I used olive oil) 
1/4 cup soy sauce
2 Tbsp rice wine vinegar
2 Tbsp ketchup
1 Tbsp brown sugar
1 garlic clove, minced
1/2 tsp grated fresh ginger (*I used ground ginger)
1/4 tsp red pepper flakes
1/2 cup cashews

Combine flour and pepper in resealable food storage bag. Add chicken. Shake to coat with flour mixture. Heat oil in skillet over medium-high heat. Brown chicken about 2 minutes on each side. Place chicken in slow cooker. Combine soy sauce, vinegar, ketchup, sugar, garlic, ginger, and pepper flakes in small bowl; pour over chicken. Cook on LOW for 3 to 4 hours. Add cashews and stir. Serve over rice. Makes 4-6 servings.


Sunday, February 26, 2012

Lasagna rolls

This is my new favorite recipe!  I've always been intimidated by lasagna because it makes soooo much and I'd be the only one eating it.  When I found this recipe for lasagna rolls from Homemade by Holman, I was thrilled at the smaller quantity.  It's now my go-to comfort make-ahead lunch!  The sauce is also a new fave and I'm starting to make that on it's own to use for other stuff :-)

Lasagna roll-ups 
http://homeiswheretheholmansare.blogspot.com/
8 lasagna noodles
1/2 pound lean ground turkey
1 T olive oil
1 clove garlic
1/2 onion
1 can crushed tomatoes
1 egg
1/2 cup ricotta cheese*
1/4 cup grated Parmesan cheese*
1 1/2 T fresh basil, chopped*
1 1/2 T fresh oregano, chopped*
1/4 cup shredded mozzarella cheese
1/2 tsp crushed red pepper flakes

Preheat oven to 350 degrees.  Heat a large pot of water to boiling over high heat.  When it reaches a boil, salt liberally and drop noodles.  Stir occasionally and cook to just al dente.  You want to leave them slightly more firm since you'll be baking the pasta.  Drain noodles and set aside.

Meanwhile in a large skillet, heat olive oil over medium heat.  Add garlic and onion and saute for 2-3 minutes.  Add turkey and brown.  When almost cooked through, add tomatoes and reduce heat to medium low.  Simmer for about 15 minutes.  Add 1/2 the basil, oregano, and crushed red pepper flakes and stir to combine.

In a small bowl, lightly beat egg.  Add ricotta, Parmesan and remaining basil and oregano and stir together.  Spray pan lightly with cooking spray.  Add enough sauce to lightly cover the bottom of the pan.  To assemble, on a drained noodle, add a spoonful of ricotta mixture.  Top with a spoonful of meat sauce and roll up.  Place seam side down in pan.  Continue until you've used all the noodles.  Top each with a little more meat sauce and sprinkle with mozzarella and remaining crushed red pepper flakes.  Bake approximately 20 minutes until cheese is melted and bubbly. 


* I omitted the ricotta, used a 3 cheese parm blend and used dried herbs.


Copycat nuggets

For the Super Bowl, the hubs and I wanted to try to make some Chick-fil-A style nuggets.  We don't have CFA here anymore and we miss it tons!  I found this recipe on Pinterest from theMy Name is Snickerdoodle blog.  

We did use peanut oil, but we don't have a deep fryer, so it took a little longer to cook.  I keep seeing other recipes that call for marinating in pickle juice, so I may just try that next time.  They weren't exactly like CFA, but they came close.


Chicken Nuggets2 skinless and boneless chicken breasts
1 cup milk
1 egg
1 1/4 cups flour
2 TBSP powdered sugar
2 tsp salt
1 tsp pepper
peanut oil (is best) or canola oil

In a medium bowl whisk the egg and stir in the milk. Trim any fat away from chicken. Cube chicken into bite size pieces. Place chicken in milk mixture,and cover. Let it 'marinate' for 2-4 hours in the fridge. This will make the chicken very nice and tender. In a gallon size resealable baggie combine flour, powdered sugar, salt and pepper. Seal and shake to combine. Place about 2 inches of oil in a medium deep pot. Over medium high heat (more towards the high side) heat oil until hot. If using a thermometer let the temperature reach 375°. If you don't have a fancy gadget like most people, I always test my oil by dropping a few drops of water into it. You want it to sizzle and not pop too much. Adjust your heat if necessary. Using a fork or tongs remove cut chicken from milk mixture and place in the flour mixture. Seal and shake until nuggets are completely coated. Place about a 6-8 nuggets into hot oil and let them cook until golden brown, turning half way through once the edge of your chicken starts to turn white. About 1 minute each side. Always double check to see if any chicken you make is cooked through. I always just make a tiny cut to see if it's pink. Remove and drain on a paper towel. Repeat until all nuggets are cooked. Serve with your favorite sauce! 


Pasta Pie

This Pasta Pie from Noble Pig was the first thing that I made from Pinterest.
It looks a lot harder than it really is and it was pretty fun squishing the sauce on top of and into the rigatoni ;-) Next time I need to really break the meat up as it's browning since it makes the last step much easier.  This is definitely a keeper!  It does make a lot, so I may try halving it and using a smaller springform pan.

Pasta Pie -- Noble Pig.comAdapted from Martha Stewart
1 pound rigatoni
2 Tablespoons olive oil, divided
1 pound ground beef 
(I used ground sirloin)2 garlic cloves, crushed
1/4 teaspoon freshly ground pepper
1 can (28 ounces) good quality crushed tomatoes
Butter, for pan
Salt
1 cup finely grated Parmesan cheese
8 ounces coarsely grated mozzarella

In a large pot of salted boiling water, cook pasta until slightly underdone (I cooked mine for 12 minutes when the box indicated 14 minutes).  One pound of pasta should be cooked in 6 quarts of water, make sure you are using a big enough pot so the pasta doesn't stick together.  When done, rinse in cold water and drain again.  Toss pasta with 1 Tablespoon olive oil to coat.  Set aside.

Heat remaining 1 Tablespoon olive oil in a large skillet over medium-high heat.  Add ground beef.  Cook, stirring occasionally until browned.  Add garlic, 1 teaspoon salt and pepper.  Cook 2 minutes more.

Add crushed tomatoes; simmer until thickened, about 20 minutes.

Toss pasta with Parmesan cheese.  Butter a 9-inch springform pan.  Tightly pack pasta into pan, standing each piece on end.  Spread meat sauce on top of pasta.

Push the meat sauce into the pasta holes filling each one up.  Stuffing the meat into the holes is a weirdly satisfying task.  Enough said.

Place in a 400 degree oven for 15 minutes.  Sprinkle mozzarella cheese on top and bake another 10-15 minutes until cheese is golden.  Remove from oven and let stand for 15 minutes.  Run a knife around the edge to loosen and then unmold. 

Cut into wedges and serve with any remaining meat sauce you might have.

Breakfast sandwiches

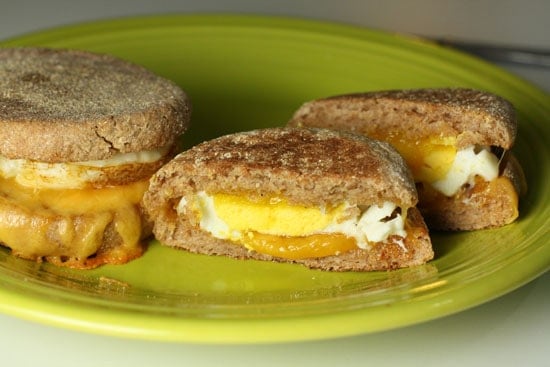
I'm always looking for quick and easy breakfast ideas. I need something with protein in the morning, so I was excited to see these English muffin sandwiches from Macheesmo Cook Something.
I used liquid egg whites instead of whole eggs and cooked them in a silicone muffin pan.  I had to cook them a bit longer than it recommended.  I froze them and took one out in the morning.  It took over 30 minutes to reheat and I generally don't have that much time in the morning.  I guess if I had a toaster oven, it might go quicker.  The next morning I tried the microwave, but just like the site said, that made them chewy and not very good.  So, I decided these would actually be better to eat on a weekend.  

The next weekend, I just made a big batch of scrambled eggs with cheddar cheese.  Then I baked some biscuits.  Each morning, I heated up a scoop of eggs in the microwave and put it between the top and bottom halves of the biscuit.  Perfect!


Banana bread without oil or sugar!

So far I've made a few recipes.  Last weekend I tried this banana bread from 8 Weeks to a Better You Recipes.

Overall, it was okay.  I love that it uses honey and applesauce instead of sugar and oil.  Next time I'll make it in 2 smaller loaf pans.  I had to cook it almost twice as long as the center just wouldn't cook.  The texture is good, but it needs something else, so I'll add pecans next time.

Yikes!

Wow, I can't believe it's been a year since I last posted!  In that time, I've discovered Pinterest!  I decided that I'd start blogging again to document the things that I've made from my pins.  Thanks to Pinterest, I've rekindled a love for cooking.  I'm loving finding new recipes, reading everyone's comments and changes, and then making it my own.  Not only am I cooking more, but I'm also crafting more, so I'll include those adventures, too!

Monday, February 21, 2011

Love Will Keep Us Together!

My parents are celebrating their 40th anniversary this year -- wow!  I was looking through some pics and found some from their wedding, so I thought I'd play a bit.  I came across this challenge at Scrap It With a Song that was just perfect -- get inspired by The Captain and Tenille;-)  The sketch is from Pencil Lines and is for the design team application.  I'm not getting my hopes up, but I loved this sketch and thought I'd give it a try!
Peggy and Gary, August 21, 1971


 Supplies: Paper, My Mind's Eye; Letter Stickers, Making Memories; Flowers, Prima and other; Assorted ribbons and brads

Sunday, February 20, 2011

HMITM Challenge #165

I'm trying to get back into actually making scrapbook pages.  I've been making tons of cards, mostly using kits and such.  They look cute, but they don't require much thought on my part.  That has made it difficult to get back into using pics and pages.  So, I started scouring the challenge blogs and found this fun one at How Much is Too Much.  I'll admit that it took me quite a while to settle on pics and papers to use, but once I started cutting and sanding, I felt like I'd found my spark again:-)

Here's the finished product:
Hidden journalling: My 1st trip to Portland was a whirlwind.  Luckily I was here for 2 weeks:-)  Eric took me everywhere -- Mt. Hood, Gorge, Newport, downtown, Japanese Gardens, Pittock Mansion, plus many more.  If he was trying to sell me on living here, it worked!  I fell in love with him, his family AND his city:-)


The challenge was to use:
~ 2 pics: These are from my 1st trip to see Eric in Portland.  
~ at least 14 hearts:  (I have 16!  I used 13 across the bottom since our 13th anniversary is this week, then 3 heart brads as accents.)
~ an arrow: I turned the hearts on their sides to mimic a row of arrows across the bottom.
~ mostly red and brown: I took this literally and only used those colors;-)
~ a flower: yep, I've got 2!
~ ribbon: of course!  It wouldn't be finished for me without ribbon somewhere;-)

I'm noticing that my last few layouts have used a lot more white space than I normally use.  I'm liking this look!

Finally got some prints!

2011 Project Life is still going strong.  I do love having the kit this year and Eric has already asked if I wanted to get it again next year:-)  Um, of course!

I know I haven't posted layouts recently.  I've been keeping up with my writing and picture-taking, but I'm only printing pics once a month or so.  Here are weeks 2-6 :-)

Week 2

Week 2 New camera and getting organized

Week 3

Week 3 Trip to Kansas

Week 4

Week 4

Week 5

Week 5

Week 6 Met Alter Weiner, Holocaust survivor

Week 6

Week 7 Sick and snow
You may have noticed my new toy, the Sizzix Big Shot.  I've been having fun cutting and embossing with it.  It took me years to figure out which tool I wanted and I've played with this one quite a bit recently and really like the cost and versatility.

I've been busy making lots of cards and I'm fixing to start on a scrapbook for Eric about his sailboat that he refurbished and lived on before we met.

That's all for now:-)

Friday, January 28, 2011

Great layout idea!

Since I'm doing Project Life this year I've joined the message board over at Big Picture Classes.  This is such an amazing group of people who offer encouragement and TONS of ideas!

Ellie has shared her blog with us and she recently posted about a cool addition to her PL -- a 6x12 layout!  Check it out here!  It's pretty awesome and makes me want to try it soon!

I'll be posting updated pics soon -- I was in Kansas last weekend, so I haven't printed pics in a bit.

Tuesday, January 11, 2011

And the winner is...

Thanks to everyone who left such wonderful comments on my layout!

Congrats to Leslie -- you are the Scrapbook Challenges Blog Hop RAK winner!  I've send you an email requesting your address :-)
Leslie said...
Love the colors you used and those pics are too cute!

Sunday, January 9, 2011

Project Life -- Week 1 complete!

I am so excited to have 5 pages in my Project Life album done!  Yep, 5!  "How did you get 5 pages and it's only January 9?", you may ask.  Well, the 1st is the title page, so that was a gimme :-)  I wanted my weeks to run Mon-Sun, since that's how my life runs -- Monday begins the school week, so Monday is day 1 as far as I'm concerned.  But, I didn't want to skip the 1st 2 days of the year, so after reading some advice on the (fabulous!) Project Life Message Board, I decided to do a layout that served as a bit of an introduction.  I included info about current faves and prices, as well as current pics of us, the house, etc.  Then, of course, I have my "real" 1st week:-)  I'm absolutely loving the simplicity of this project kit!  You may notice that I am adding some embellishments here and there.  What's nice is that I don't feel compelled to add to it, I just did it because I had time and thought it'd be fun, but it may not be an every week occurrence.

Want a peek into my album?!  Here you go!
Title page

Intro page 1

Intro page 2

Week 1 page 1

Week 1 page 2       

Thanks for looking:-)  Have a great week!

Saturday, January 8, 2011

Scrapbook Challenges Blog Hop and RAK!

As you might have noticed, I haven't done many scrapbook lo's lately.  I've just been in a funk I guess, but I have been making lots of cards.  Thankfully I've snapped out of my rut thanks to the Blog Hop over at the Scrapbook Challenges Ning!  They've got a fabulous sketch and lots of amazing designers sharing their take on it.  There are tons of prizes, too, and you're invited to play along. 

Start the hop here at Pamela's blog.
Click here to Hop On to see what other members have created and to get details on how you can participate!

Here's the sketch:


Or if you prefer a 2-page layout:
http://api.ning.com/files/tdU*LJLIRgpNiV7qPeOXvLODKVdwMQZCZVuOsFr1OwhEZBQ*PAjZk48M8QxUDM0tUxFnp9ciFgIuIhsQ0LNTkLY1YZXh7eBx/Sketch235twopager.jpg 


Here's my take:
Materials used: All paper from Creating Keepsakes "Just For Fun" kit; 
letters and velvet brad - Making Memories; 
crushed velvet ribbon - American Crafts; flower - Prima

 I've also got a little surprise RAK for someone who leaves a comment on my little bloggity blog:-)

I hope that you decide to join in the fun!

Tuesday, January 4, 2011

So far so good

Well, I'm 4 days into 2011 and Project Life and so far I'm keeping up!  I really do love the simplicity of having the cards ready to go and just having to write my info for each day.  I can get them done in just a few minutes.  I plan on taking some time each weekend to add a few embellishments to the previous week -- I do love me some ribbons, brads and flowers!

Pictures coming soon!

Saturday, January 1, 2011

1/1/11

Happy New Year! Today's date just makes me happy for some reason! It's fresh and new and uniform:-) I love it!

I've always had good intentions for this blog, but then life got in the way. Not this year! My word for this year is: Create. Part of that includes "creating" this blog and creating things to share here.

I'm very excited to get started on Becky Higgins' Project Life this year. Some of you know that I tried my own version last year using file folders. Well, I made it through April, then had the kidney stone incident and everything fizzled. I've always loved the PL kits, but thought since I had so much stuff in my scrap room that I could come up with my own 'kit'. I found that I was easily overwhelmed and longed for something to keep me focused. "Shiny things" distract me;-)

So, I used some Christmas money and bought the 2011 kit and it arrived on Thursday. Wow, wow, wow! Plus there's an awesome message board where everyone is meeting and greeting and sharing fabulous ideas and past experiences. It's a goldmine of info! And then, there's Becky, of course, who is constantly making videos and posting cool stuff on her blog to get us ready. Can you tell I'm geeking out a bit?! Just a tad;-)

In fact, I'm so motivated for 2011, that I'm actually going back to 2010 and working on that project, too! I spent yesterday printing as many pics as I could find from last year and then went back through my Facebook profile (yes Eric, there IS a positive reason for Facebook!) and took notes based on my statuses and comments. I picked 3 sketches and will just use those so I don't get overwhelmed. Some weeks may not have a ton of pics, but I'll fill in with movie posters or book covers (FB helped with those, too!) and things that were happening in the world.

Whew, that's a lot of words! I'm a reading teacher with an English lit degree, so I tend to ramble;-) Here's to a great year!

Happy 2011!

Sunday, November 7, 2010

Sunday sketch

This card came together very quickly for me. I loved the sketch for Challenge 245 and wanted to use it for a Thanksgiving card.
https://blogger.googleusercontent.com/img/b/R29vZ2xl/AVvXsEi1omFEIiAapbKXlhyNHwKndQsWBf6c2E6EqvrElm58Q45nvyHOCikQfH3XHrYw9kXcWxe5hjeTMsT_t3OSFtdfyk6AbS5PDnEWnVWniQYGXGYixM_Xnw6hmZYw-mtHJtbmffHCwE_ffH6k/s1600/Sketch+50.jpg

Minty goodness!


Mad About Mint was the theme for Day 246. We could take that phrase however we wanted and create a card. I immediately thought of peppermints and knew that I had the perfect stamp. I had just purchased the stripe border stamp today and thought it would be perfect in red to represent a candy cane!